
Chapter 9: Invoices
Invoices
This chapter contains:
- Invoice Overview
- Invoice Query, including Refunds and Adjustments, and Voiding
- How to enter Spoiled Tickets and enter Finance Charges
- Additional miscellaneous Invoice features
Enter New Invoices in Trams Back Office
Invoices are the daily records of sales and refunds, and are the main source of information for the system. Sales, Refund, Vouchers and Adjustment invoices are entered, queried, retrieved, modified and voided in the Invoice section of Trams Back Office. Invoices are entered into Trams Back Office either through the interface process, by entering them into ClientBase, or by manual entry. If the agency interfaces, an interface record is created each time an agent drives a ticket or an invoice.
Specific accounting, client, vendor and booking information from the interface record is downloaded to Trams Back Office and becomes available for accounting, tracking and reporting needs. Once the downloaded invoices have been received and processed by Trams Back Office, modifications can be made manually to all of the fields except the Record Number which is computer assigned. (For more information on interfacing, see the Interface Guide located at Start|Programs|Trams Back Office|TFW Interface.)
Important Note: Trams accepts an invoice number range of 0 to 2147483647. Anything higher will NOT be accepted either manually or via the Interface.
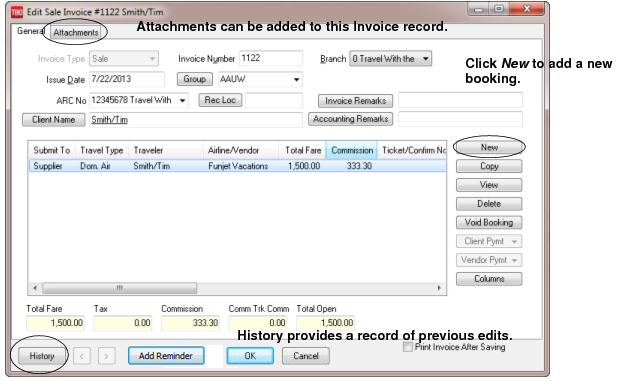
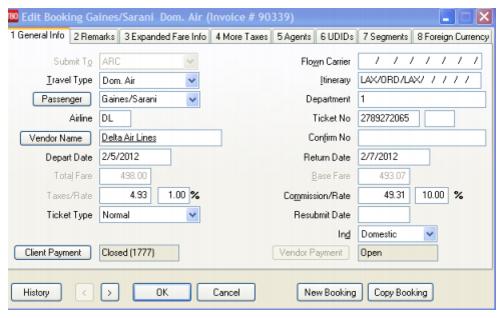
Invoices in Trams Back Office are made up of three parts: The General Invoice Information, the Individual Booking Details, and the Booking Summary Screen. General invoice information includes information pertaining to the entire invoice, such as Invoice Number, Client Name, and Issue Date. Booking Details contain specific details of a booking, such as Airline or Vendor, Ticket or Confirmation Number, Fares and Commissions. The Booking Summary screen includes a list of all bookings entered along with Invoice Totals.
When manually building an invoice in Trams Back Office, first enter the general invoice information, then enter each booking.
General Invoice Information
The Sale, Refund and Adjustment (Debit/Credit Memos) screens are combined into one screen that can be accessed by clicking Invoice|Sale or Refund or Adjustment. When the New Button is selected from the Invoice Query Screen, access the “all-in-one” invoice screen, as well. The screen is defaulted for a Sale Invoice. From this single screen change the Invoice Type to a “Refund Invoice” or “Adjustment Invoice” (Debit/Credit Memos).
All the invoice screens are non-modal, meaning that one can click off the screens and go do another task in the program without closing the invoice screen. It is saved in the File Menu under Window, and can be reopened to the same invoice screen.
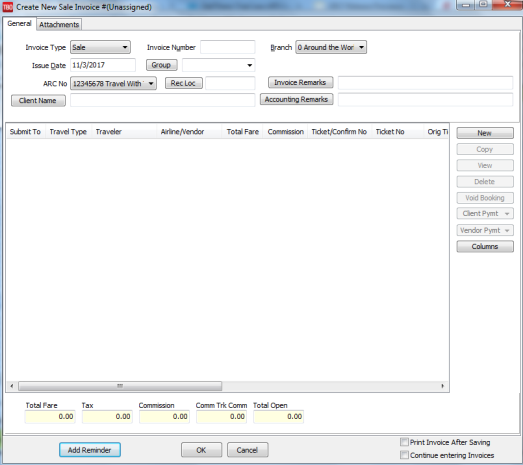
GENERAL TAB - Invoice Header |
|
|
Invoice Type |
Choose the invoice type from the drop-down menu. Types include Sale, Refund, or Adjustment (Debit and Credit Memos). |
|
Invoice Number |
The invoice number is left blank until clicking OK to save. This is because the invoice screens are non-modal and multiple invoice screens could be open at any time. As soon as OK is clicked to save the invoice the first time, the invoice number is filled in, and Enter a payment for this Invoice? message appears. Either accept the invoice number being defaulted, or change to another unused number in the system. |
|
Branch |
Duplicate invoice numbers are not allowed within the same branch. If branching ability is turned on in Utilities|Setup|Global Defaults, enter a branch number from 0-249 from drop-down menu. |
|
Issue Date |
The date of the transaction. The default date is the system date. To change the date manually, enter it in mm/dd/yy format, or double-click on date from calendar. |
|
Group |
An alphanumeric group field (up to 15 characters can be used) is used to link invoices together for reporting purposes. Reports can be printed for an individual, identifying groups travelled with in the past, or printed for the entire group, to view the overall status of a group. To enter an invoice group from this screen, click the Group button to add a new group. Individual travelers maintain their own profiles thus eliminating the need for separate group travel profiles. |
|
|
Lisa is a member of her college ski club. During the winter season, she travels with the club at least four times. In the spring, Lisa's family is having a big reunion on a weekend cruise to Ensenada. Lisa has her own profile in Trams Back Office. If the group name appears in the Group field on Lisa's invoices, you can see all the trips she made this year by herself or with a group. The information used in this feature can be entered from the Trams Back Office keyboard or by using the interface from the GDS. |
|
IC Code |
Enter the IC identifier if using the IC/Host feature. This field is only available for use when the Host has created an IC Code in Utilities|Setup|IC-Host Codes. |
|
Marketing Code (Marketing ID) |
Invoices created with the field populated in a Host database (adding *MIXXXX in the PNR) will include this field in the IC/Host Export Utility created by a Host (Host to IC) when passing GDS created invoices back to the IC for import into their Trams database. The Marketing Code matches to the Client Profile Interface ID codes in the IC database and captures the invoices under the correct profile even though the invoices were created by the IC in the Host GDS under a single House Account client profile. This field is only available for use when the Host has created an IC Code in Utilities|Setup|IC-Host Codes. |
|
ARC/BSP No. |
This field shows only on multi-branch versions of Trams Back Office to report the travel by ARC/BSP number for weekly reporting, but still give credit to the branch that booked the travel. |
|
Record Locator |
Enter the record locator number in the Invoice screen. It is located next to the invoice number and is available as a selection in the Invoice Query screen. If the invoice was interfaced, this locator number is filled in automatically and is used for retrieving or referring to an interface record by record locator number. By clicking on this button, review the interface record and Print, Copy to ClipBoard, or Save to File. Our support and interface desks use this to help troubleshoot any interface format issues. |
|
|
The Smith family purchased tickets for their summer vacation and had to change the travel dates twice. When the tickets are re-issued and the exchange transactions are interfaced to Trams Back Office, the record locator is added automatically. Use Invoice Query to search for Record Locator QP35YR and locate all of the Smith family transactions using this record locator. The invoice for the original tickets and the invoices for the exchanged tickets appear on the screen. |
|
Invoice Remarks |
Click to enter remarks to print on the invoice. The remarks are specific to this invoice such as “This flight is full, please be sure to arrive early for check-in.” The remarks print at the bottom of the invoice when the Print Invoice Remarks checkbox is checked. |
|
Accounting Remarks |
These remarks can only be inserted manually in TBO (no updating via interface or ClientBase). This field and the Invoice Remarks field display as one line due to space limitations; clicking the Invoice Remarks or Accounting Remarks button (to the left of the field) brings up a new window to view and edit the remarks. |
|
Client Name |
To identify a client by Name, enter a portion of the client name in the Client Name field. Once some letters are entered, a pull-down menu appears, with a list of all matching profiles. Click on the desired name and move the client name into the invoice. Right-click in the Name field and choose Search by ID Create a new profile by clicking the Client Name button, to launch the Profile Query screen. Warning: Any variation in the way the client name was entered here versus how the name was entered into the Profile causes the system to prompt with no match, and wants to build another profile. Avoid building duplicate profiles by being diligent about typing as few letters as possible into the Name field during query, and selecting from the results. |
|
Print Invoice After Saving |
Check Print Invoice After Saving to print another copy of the invoice. Remove the check from the box if a printed copy of the invoice is no longer required. |
| Add Reminder | Click Add Reminder to attach a reminder to the new invoice.
Note: See Chapter 8: Reminders for more information about creating and editing reminders. |
|
Continue entering invoices |
To enter multiple invoices at one time, make sure the Continue entering invoices box is checked. When entering the last invoice, uncheck this box to return to the main menu instead of the next invoice header screen. The issue date, branch, and ARC/BSP No. are carried through to the next invoice. |
|
History |
To view when or who (for separate log-ins) has entered or modified an invoice, click the history button. |
ATTACHMENTS TAB
In TBO version 3.05, an attachment tab has been added to all profile (Client, Vendor, Agent, Other), all invoice types (sale, refund, adjustment) and the payment screens. The tab is located adjacent to the tab now named General at the top of each screen. Within the workspace area of the new attachment tab, users can manage (add, view, delete, update) electronic documents of any type.
|
Filename |
Click the browse button to locate to the desired file. |
|
Compressed |
Defaults to enabled. Compressing the file helps to reduce the file size (maximum file size is 8MB). |
|
Description |
Enter a user-defined description. |
|
Path |
This field is automatically populated based on the location of the file. |
Add, adds a new file; Update, updates the existing file with a new or updated file; View, opens the file; and Delete deletes the attached file.
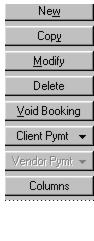
The Client and Vendor Payment Buttons have two selections that can be made from each button, View and Void. View opens full Payment Query Screen to make changes to the payment. Delete permits deleting a booking without any tracking. Cleaner looking invoices are created by not having Voided Booking items shown. If a void is desired to be shown as in the past, that option is available. There is also a Columns Button to customize, order, and size any columns that are available. Select the desired columns, rearrange them by using the up and down arrows and click OK to save. Lengthen or shorten the fields, go back into Columns and check the Save Settings box.
Note: The first agent and his/her status is part of the columns displayed in the bottom half of the new screen. Instead of only being able to see the first agent in any given booking, choose to see up to 4 agents for each booking in the invoice. Go to Columns and select any number of agent columns, up to four, to display on the results screen. The column shows both the Agent ID and the Agent Type. To display only the 1st and 2nd agent in a booking, move agents 3 and 4 from the Displayed Fields side of Columns to the Available Fields side. Remember to check the Save Settings box before clicking OK.
Applying Payments When Saving an Invoice
When clicking "Yes” to Enter a payment for this Invoice?, a full Payment Query Screen is displayed to make one or more payments to the invoice. Notice that the Total Invoice Amount Open is defaulted in the Amount field and the invoice is already Toggled Closed with the Form of Payment of Check. Enter a check number or change the Form of Payment and click OK to complete the payment.
In addition to applying a single payment to the single invoice being saved, apply any previous vouchers created against the invoice being saved. Even apply a payment to more than one invoice for the client.
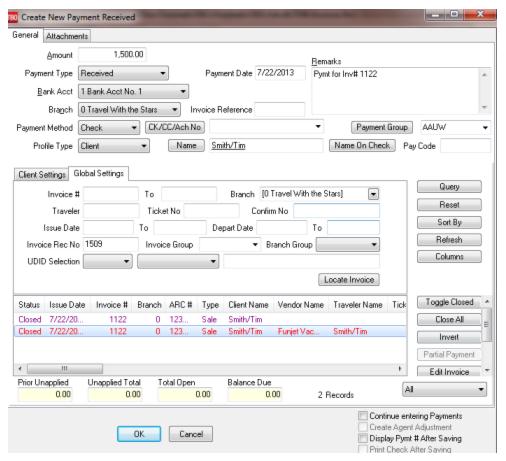
When the above screen is displayed, click on Reset and then Query, and all unapplied vouchers and open invoices for the client are displayed. By changing the defaulted amount to the correct payment amount, apply previous vouchers and a current payment to close off the invoice being saved. Attachments can be added to payments. (See above for more details on adding attachments.)
Booking Detail Screen
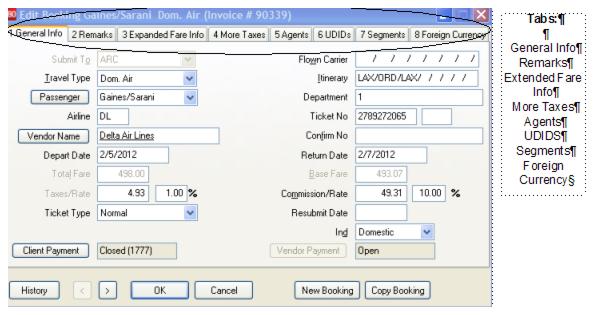
Each invoice has at least one booking detail screen. An invoice with an airline ticket and a hotel has two booking detail screens. (Not interfacing? See sections Adding a Second Booking to a New Invoice or Adding a Second Booking to an Existing Invoice, later in this chapter.) Enter sales information from the hard copy invoices, including total fares, commissions, airline codes, vendor names, and ticket numbers. The booking information screen is used for any type of sale, including airline tickets, tours, cruises, car rentals, etc.
The booking screen is also non-modal, meaning that a user can click off the screen and go do another task in the program without closing the booking screen. It is saved on the File Menu item, Window, and can be reopened to the same booking screen. Identify the Booking Screen to re-display by looking at the top of the screen and noting the Invoice Number of the Booking, and if more than one booking is open, the Travel Type of the Booking, “Air”, “Car”, “Tour” etc.
Use hot keys to move from tab to tab in the booking screen, by holding down <ALT>, and pressing the specific tab number. Also use hot keys in the various booking screens, by holding down <ALT>, and pressing the underlined letter before the field.
After ending the general sales invoice entry, Trams Back Office prompts for specific booking details.
ARC/BSP Booking Detail
Supplier Detail Booking
Remarks
|
Client Remarks |
Access the Client Remarks field by clicking on the Remarks tab. Miscellaneous client remarks appear on all Client Statements and Fare Savings Reports, and can be used as selection criteria in the Report Generator. These remarks can be entered via interface. |
|
Vendor Remarks |
Access the Vendor Remarks field by clicking on the Remarks tab. Miscellaneous vendor remarks, appearing on all Vendor Statements, are used as selection criteria in the Report Generator. These remarks can be entered via interface. |
Expanded Fare Information
Additional information about the booking are entered on an Expanded Booking Information screen. To get to this screen click the Expanded Fare Information tab at the top of the booking screen.
|
Face Value |
Works in conjunction with fields in the General Booking screen, when discounting or markup is involved. In these cases, enter the actual fare the ticket is sold for as the Total Fare (amount receivable from the client). Then, enter the actual commission or income earned after discounting into Commission Amount in the General BookingInfo. Click on the expanded fare screen, and enter the fare to be shown on the ARC/BSP report as the Face Value. Trams accounts correctly for the agency records, and generates the proper report to ARC/BSP specifications. |
||
|
Net Remit |
The read-only Net Remit field indicates the net remit amount for ARC/BSP tickets as they would appear on the ARC/BSP reconciliation report. To calculate the true net remit amount, the commission amount field is reduced by the amount of the discount, and if the commission rate field is populated, the rate is removed and the commission amount is reduced by the amount of the discount. This reflects the correct net remit on the Expanded Fare Tab and on the Vendor Balance report. It also correctly reflects the revenue earned on the booking as part of the commission is given back to the customer through the discount. |
||
|
Markup +/Discount - and % |
The discount is automatically calculated as the difference between the “Face Value” and the “Total Fare”. This area can be modified - when a discounted or minus value is entered, the Total Fare field is reduced by the same amount, along with the Commission field. When a marked up or plus value is entered, the Total Fare field is increased by the same amount, along with the Commission field. If the Face Value is zero, then the Face Value is set to the old Total Fare value. The Markup/Discount Rate % field is only an aid to calculating a markup or discount when a rate is known but not the amount. The field allows entry of the rate to do the calculation, but the rate will not be saved after the booking is saved. Any additional changes made to the amounts in either the TF or Comm fields directly affects the amounts for the FV and Markup/Discount fields. Entering a rate in the rate field only calculates the initial settings for those fields. |
||
|
|
Entering a 10% discount as -10.00 decreases the TF & Comm fields, while capturing the original TF in the FV field. This would be the same as entering -100.00 in the Discount Amount field. Original Gross TF = 1000.00 Original Comm = 200.00 Rate of Discount = 10% of Gross or 100.00 New TF = 900.00 New Comm = 100.00 |
||
|
High Fare |
The full coach fare of current itinerary appearing on the Fare Savings Reports. |
||
|
Low Fare |
A lower, denied fare of current itinerary that can appear on the Fare Exception Report. |
||
|
Fare Code |
The two-character (alphanumeric) justification code which can appear on the Fare Savings Report. These codes are maintained under Utilities|Setup and Fare Codes and should be set up prior to interface. |
||
|
Orig Comm |
When discounts or markups are applied, the original commission for the booking is shown and does not have to be mentally calculated as the difference between Face Value and Net Remit. (Face Value +/- the Original Commission equals the Net Remit.) |
||
HOTEL INFORMATION
|
Number in Party |
Used for additional reporting available in the Report Generator. |
|
Number of Rooms/Cars |
Used for additional reporting available in the Report Generator. |
|
Description |
Any 10-character miscellaneous description. |
|
Comm Track CC No. |
Enter Comm Track credit card number. (When an invoice is driven in ClientBase, the credit card number appears here.) |
TICKET INFORMATION
|
Ticket Designator |
The ticket designator is captured through interface or manual entry and is used for advanced reporting capabilities with software such as Crystal Reports. |
|
Tour Code |
The tour code is captured through interface or manual entry and is available for use through reporting software such as Crystal Reports. |
|
E-Ticket |
The check mark for this box is captured through interface or manually checked and allows reports showing the number of E-tickets run by the agency. |
|
Booking Record Locator
|
Capture a booking level Record Locator number for those non-ARC/BSP air bookings in a separate field and capture any ticket/confirmation number for that booking in the Confirmation Number field. A new interface descriptor code entry of *RL specifies a booking-level Record Locator on an MS line.
|
|
Host Code: |
A drop-down field to capture the Host Code is only visible or available for entries until an appropriate IC or Host Code is created under Utilities|Setup|IC/Host Codes.
|
More Taxes
The default for GST and QST and other Canadian taxes is entered under Utilities|Global Defaults|Tax Related. All tax allocations can be changed under the Utilities Menu then under the Global Defaults. Look for BSP Tax Rates 1-4, GST and QST and other Canadian taxes. Attach up to a 30-character identifier to each tax field by going to Utilities|SetUp|Global Defaults|Tax Related. Enter the name or code for each tax. Tax codes and amounts can be grouped together by entering the codes with a comma separator. Click OK to save.
A tax table has been added to the database to allow for additional taxes to be captured. The interface parsers were also enhanced to read any taxes delivered via the GDS interface records. To expedite deleting tax details a Delete All button has been added. In order to change the tax amount in the general tab, the detail tax information needs to be cleared. Now all taxes can be cleared by clicking the delete all button, the tax total is then also updated in the general screen to show zero amounts.
Note to Sabre subscribers: Sabre GDS sends a maximum of 3 taxes in the IUR. If there are more than 3 taxes, tax amounts tax 3 and beyond are all combined in the XT tax amount. For Canadian customers, if the RC (HST) or XG (GST) tax falls into tax field 3 or higher, the amounts cannot be broken out.
These fields can show a breakdown of miscellaneous taxes such as airport improvements, security tax, or port tax on cruise bookings.
|
JCT Corporation has a contract with the government and is doing a lot of international travel. They want your agency to provide them with a report that details the airfare and separates the taxes paid. You capture the airfare in the booking screen, and separate each tax in a different field for their reporting purposes. You create a JCT Tax Report in the Build Report section of the Report Generator that incorporates each one of these tax fields. |
The information used in this feature can be entered manually or by using the interface from the GDS.
Agents
Link sales agents to a booking by accessing the tab Agents found at the top of the invoice booking screen. This commission screen is extremely flexible. The number of agents that can be added is 9 per booking. Enter a percentage, a flat dollar amount, or a negative dollar amount if charging a fee to the sales agent. There is not a limit to commission percentages. A sales agent can receive a 30% commission, a $5.00 booking bonus, and be charged a $10.00 processing fee, all in one booking. The information used in this feature can be entered from the Trams keyboard or by using the interface from the GDS.
Identify an agent on the Agent Tab of the Booking Screen as either Blank, Booking or Ticketing. The Action field indicates the following:
Blank = An Outside Agent or Additional Agent not identified as either Booking or Ticketing.
Booking = The Booking Agent as identified from the GDS Interface Record.
Ticketing = The Ticketing Agent as identified from the GDS Interface Record.
To flag bookings with booking or ticketing actions, the option must first be enabled under Utilities|Setup|Global Defaults|Interface Mailmerge Prompt, Read Booking Agent OR Read Ticketing Agent. Recommendation is to only select booking or only select ticketing (not both as duplicate agent transactions will be created if the agent is both the booking and ticketing agent). The option to read the Booking Agent is set as the default. The Action field is set from a flag in the interface record.
The Action field will only be automatically completed for future bookings created through Interface.
|
|
Mary Smith, an outside agent, sold a $3000 cruise. Her booking shows her 50% commission, but she sold a preferred supplier so she is eligible for your $10 preferred supplier bonus. You add another line to the sales agent commission box for $10 and enter Pref Sup Bonus in the commission remarks. Mary receives her commission report and is happy to see each amount separated on her monthly statement, including your remarks. |
Note: Agent Payments are now linked to the Agent Bookings Cleared when using the Agent Reconciliation. The Date Paid field is filled in at the end of the reconciliation process, and the View Pymt button links to the Agent Payment.
UDID’S
UDID’s (User Definable Interface Data) are pieces of information attached to a booking for reporting purposes. They are stored in the invoice booking screen and accessed through the UDID’s tab at the top of the screen. Click on UDID’s to display the table. There are 999 UDID fields. Each field has capacity for 128 alphanumeric characters (if using the GDS, the capacity is 60 alphanumeric characters).
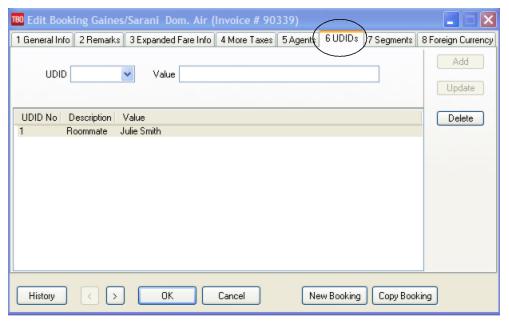
For reporting purposes, UDID’s can define categories for each booking, giving access to information which may be important for clients and to customer service — as well as, the agency database. By listing the UDID’s in a table, they are easier to read and input and they are separated from the client remarks field. UDID’s can contain both negative and positive dollar values which are added together in the report generator.
If you update UDIDs using the UU override function with HU codes:
- Existing UDID values will be over-written with the updated *UU values.
- Blank *UU values will not clear or delete existing UDID values.
- UDIDs will only be updated if both the *HU and *UU values exist.
- *UU will work for all GDS and will work the same way *HU works today (by issuing an itinerary, not an invoice).
-
It is not possible to mix regular UDID entries and UU overrides in the same record. When updating a hotel or car, issue the standard HU itinerary (with the original UDIDs) then if UDID entries need to be updated add the *UU entries and drive a new itinerary.
Example:
- *HU
- *UU10 Free flow text
To de-activate a UDID, go to Utilities|Setup|UDIDS, click on the UDID and the Inactive button at the top of the screen.
Segments
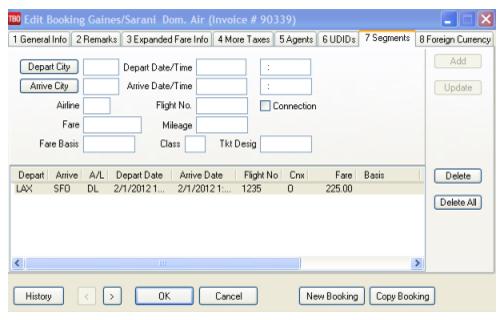
Airline segment information should be added to ARC|BSP supplier and commission tracking bookings. This information is used to calculate accurate segment counts in the City Pair Report under Reports|Invoice|CityPair. If segment mileage is present in the interfaced PNR from Sabre, Apollo, and Worldspan, Trams captures that mileage in the mileage field. The mileage can also be manually entered. To find segment information in the invoice booking screen, click Segments. Airline segment information is linked to tour and cruise bookings and to non–ARC/BSP carriers such as Southwest Airlines.
|
Your client, Jeff, books a Caribbean cruise. When you enter this booking in TRAMS, you include his arrival and departure time, flight number, and date in the Segments screen. You print Jeff an invoice (found in the main Reports menu, under Invoice|Invoice Printing) for the cruise booking that also includes his flight information and schedule. |
The information used in this feature is entered from the Trams keyboard or by using the interface from the GDS.
Foreign Currency
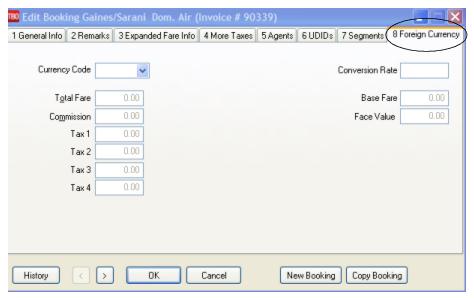
TBO now captures Foreign Currency and Local Currency for each booking where both are present. The local currency populates the General Tab Total Fare, while the Foreign Currency populates the Total Fare on the Foreign Currency Tab.
Note: TBO reads automated HK segments when both local property currency and local agency currency are included in the TAIR. TBO captures Foreign Currency and Local Currency for each booking where both are present.
Add an Additional Booking to Existing Invoice
To add another ticket, hotel, car booking, etc., to an invoice previously entered into Trams, create a separate booking.
1. Click Invoices|Query.
2. In the Invoice Number field, type the number of the invoice to which the booking is being added. Click Query to process.
3. To view the invoice, highlight it and click the View button.
4. Once the invoice is displayed, click the New button and enter the booking information, as usual.
5. After entering the booking information, click OK to see the list of bookings. Click OK again to save the invoice and prompt for a payment.
Split Booking Option
There is a Split Booking option in the Invoice Screen (via the right-click menu on the booking list). Bookings can be split if Submit To is Supplier and both Client and Vendor status are open. This means a single booking can more easily be split into multiple bookings for applying partial Credit Card payments on an invoice or creating a CC discount. By using the Split Booking option instead of the Copy button, the total value of the invoice and total commission on the invoice is not allowed to be changed.
The Split Booking option also works on invoices in a closed period. When initiating the Split Booking option, only a TF field is available for entry. The TF for the booking being added to the invoice will reduce the amount of the TF in the original booking. Any commission on the booking to be split would remain with the original booking, and only a TF will be in the new split booking.
Example:
- Invoice Total for single booking invoice with Carnival is $2000.00 with a commission of $200.00
- Customer makes a $500.00 CC payment on the invoice.
- Right-click to select Split Booking and enter in the TF field $500.00.
- Save the split 2nd booking and the invoice now contains 2 bookings.
1st booking - TF $1500.00 with commission of $200.00
2nd booking - TF $500.00 with zero commission. On saving, the 2nd booking for $500.00 is closed by CC for the $500.00 payment.
- Invoice total remains at $2000.00 with $200.00 commission.
Multiple splits could be done on the same open original booking for any subsequent CC payments made.
Void/Delete Booking(s) on Existing Invoice
To void a booking(s) on an invoice previously entered into Trams, do so under Query.
1. Select Invoices|Query.
2. Type in the number of the invoice with the booking being voided. If the invoice number is unknown, query by any one or more of the fields shown. (It is best not to fill in all the fields. Usually two or three fields are sufficient.) Click Query to process.
3. Click the invoice with the booking(s) being voided, in order to highlight it and click the View button.
4. If the Cli Pymt and the Ven Pymt fields show payment numbers, the payment(s) must be voided in order to void the booking. Void the payment(s) by clicking the Client Payment or Vendor Payment buttons, then clicking Void on the next screen. Trams prompts, Void Payment. Click OK to void.
5. Click the booking being voided in order to highlight it, then click the Void button. Repeat for any other bookings being voided. Note: (The Delete Button permits complete deletion of a booking without any tracking for that booking.)
6. Click OK to save.
If a payment was voided in order to void the booking, re-enter the payment under Payments|Received.
Enter Client Payment from Within Invoice
Client payments are entered either after entering an invoice, or in the payments menu. Credit card payments are usually entered when completing an invoice. To allow cash or check payments to be entered upon completing an invoice, set Utilities|Setup|Global Defaults|Allow Cash PaymentsFrom Invoice to Yes. After entering a new Sale or Refund Invoice, or modifying an existing open invoice, answer the Trams prompts.
1. To enter a payment to close the Client Balance generated by the invoice, select Yes when Trams prompts for payment information.
2. If default credit card information was entered in the Client Profile, Trams displays the first default credit card. Select a different credit card from the profile by clicking on the down-arrow. Highlight the entry, moving the number into the field. If there’s no default credit card information, the field is blank. Enter credit card information here.
3. If global defaults are set to allow invoice payment by check or cash, change Payment Method by clicking on the down-arrow. Highlight the method and click, moving the choice into the Payment Method field.
4. Enter check number, bank account (if different from the default), and any associated remarks.
If cash and check payment entries have been set up in the Utilities menu, change Payment Method by clicking on the box next to “Allow Cash Payment From Invoice.” Once the payment has been stored, the Client Balance created by entering the invoice is offset and the client's account balance is reflected accordingly. The Receipts report (in the case of Sales Invoices), and the Disbursements report (in the case of Refund Invoices) is also updated accordingly. Partial or Split Client payments and all Vendor payments may be entered from within this Payments screen as well, after toggle the invoice open.
Even Exchange
1. Click Invoices|Sales.
2. Enter the Sales invoice as usual.
3. In the Ticket No field, enter the new ticket number issued.
4. Total Fare is zero.
5. Commission/Rate is zero.
6. In the Ticket Type field, click the arrow to the right of the field and choose Ex-Add Coll.
7. In the Orig Ticket No field, enter the ticket number that was originally issued.
8. Complete the rest of the invoice.
9. Click OK to save.
Exchange on MCO
1. Click on Invoices|Sales.
2. Enter the Sales invoice as usual.
3. In the Ticket No field, enter the new ticket number issued.
4. Total Fare is zero.
5. Commission/Rate is zero.
6. In the Ticket Type field, click the arrow and choose Ex-Add-Coll.
7. In Orig Ticket, enter the original ticket number issued.
8. Complete the rest of the booking.
9. Click New Booking to get to a new page.
10. Enter a second booking for the MCO.
11. In the Ticket No field, type the MCO number issued.
12. Total Fare is zero.
13. Commission/Rate is zero.
14. The Ticket Type field is Normal.
15. Click OK to see a summary of all booking on the invoice.
16. Click OK again save.
Ticket Exchange with an “Add Collect”
1. Click Invoices|Sale.
2. Enter the Sales invoice as usual.
3. In the Ticket No field, type the new ticket number issued.
4. In the Total Fare field, fill in the additional collection amount.
5. In the Commission/Rate field, enter the commission earned off of the additional collection amount.
6. In the Ticket Type field, click the arrow and choose Ex-Add-Coll.
7. In Orig Ticket No field, enter the original ticket number issued.
8. Complete the rest of the invoice.
9. Click OK to save.
Ticket Exchange with a Refund
1. Click Invoices|Query.
2. Query the invoice that has the original ticket on it by typing in the invoice number, the ticket number, or any other piece of selection criteria that is known. Click Query to process.
3. When the invoice appears, highlight it and then click Refund. This copies the sales invoice information into a refund invoice screen.
4. Change the Invoice Number to the refund invoice number. If Default Refund/Adj Invoice No has been selected under Utilities/Setup/Global Defaults/Prompt the refund invoice number will default to the same as the original sales invoice number.
5. Enter the Issue Date as the date the invoice is being refunded.
6. Trams displays all bookings that were on the original sales invoice. If multiple bookings are appearing and only one booking is being refunded, click on the record(s) not to include, then click the Void button to void from the refund invoice. The only records that remain should be the records to refund.
7. Next, highlight the remaining booking by clicking it and then click Modify.
8. In the Ticket No field, type the new ticket number issued.
9. In the Total Fare field, type in amount being refunded to the client.
10. In the Commission/Rate field, type in the amount of commission the agency is losing.
11. In the Ticket Type field, click the arrow and choose Ex-Refund.
12. In Orig Ticket No field, type the original ticket number that was issued.
13. Complete the rest of the invoice as usual.
14. Click OK to display the booking summary screen. Click OK again to save the invoice.
15. Trams prompts, “Enter a Credit Card Refund Payment for this Invoice?” If refunding to credit card, click YES. If refunding by check, click NO and enter check payment under Payments|Made.
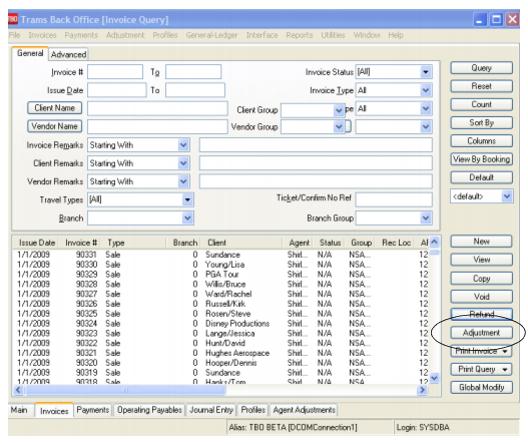
Invoice Query
General Query
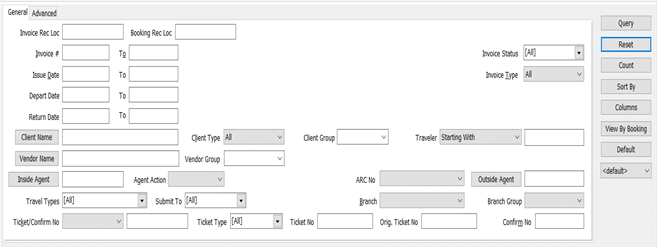
With Query, retrieve an existing (or a previously entered) invoice. The query screen is broken into two sections. The top section is used to enter the data for the query and the bottom section displays the results of the query. The fields displayed in the top section show how an invoice/s can be found. Each of these fields are fields within the invoice and can be used to locate that invoice again. As few as none and as many as all can be completed to retrieve an invoice.
The more criteria entered in Query, the more selective the search for matching invoices. The most frequently used query fields show on the General tab and additional fields are found in the advanced tab. Enter the selection criteria, click Query, and the system brings up a complete listing of invoices matching that criteria.
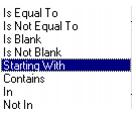
To the right of the Invoice, Acctg, Client, and Vendor Remarks fields is a separate field with selection options or operators, Is Equal To, Is Not Equal To, Is Blank, Is Not Blank, Starting With, Contains, In, and Not In. These operators can more narrowly define the search. (When doing searches on fields containing “wildcard” search criteria using the selections of “IN” and “NOT IN," this is a search for the field to contain the complete string entered between the delimiters or the exact match). In other words, In and Not In works like Is Equal to or Is Not Equal to except that the list of values when using In and Not In when separated by a comma will search for each value in the list. The entire text would need to match exactly for Is Equal to or Is Not Equal to.
For example, if the only criteria entered in the Query screen is the Invoice Type of Sale, a listing of all Sales Invoices is displayed, in issue-date order. If, in addition to the Invoice Type, a portion of the Ticket Number is entered into the Query fields, the list is narrowed further and only Sales Invoices with Ticket Numbers matching that criteria are included. This allows for quick retrieval by Invoice Number or by Issue Date.
The Ticket/Confirm No field contains a dropdown allowing a query operator to be selected. You can search for Ticket and Confirmation numbers using "Starting With," "Contains," or "Is Equal To" to define the type of search. Please be aware that searching using "Contains" may take longer than other types of queries. The Ticket/Confirm No field can simultaneously search for a Starting Ticket No, Ending Ticket No, Original Ticket No, or Confirmation No that meets the search criteria. It is also the only way to search for Ending Ticket Numbers.
Note: The Payment No field on the Invoice Query window only applies to Client and Vendor Payments.
Advanced Query
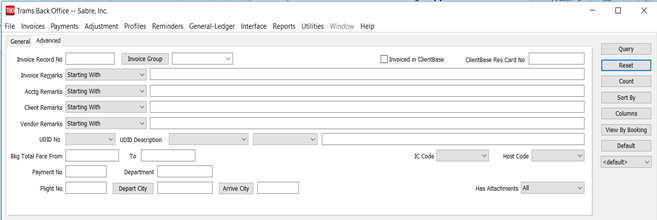
The Invoice query advanced tab provides even more fields for searches. For example, there is check box entitled Invoiced in ClientBase. When checked, invoices generated in ClientBase would be displayed on the query screen. There is also a Department field (can be added to query columns) and Depart City Arrive City fields for search capabilities. (Note: To avoid performance issues (especially with large databases), the recommendation is to include additional query parameters (such as Issue or Depart date ranges or a Client Name, etc.). The itinerary field was added to the query results column options when in view by booking mode. If using the origin/destination fields in conjunction with Depart dates, recommendation is to leave the Depart date to field blank as adding the Depart to date may cause no results to be returned.)
You can query a UDID Number with the dropdown or type in a UDID number (or partial number) and land on the desired UDID more quickly than by scrolling through the list. The UDID Description is for those who prefer to search by description. Selecting a value in either dropdown will update the corresponding UDID value in the other dropdown.
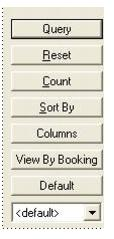
Buttons on the right side of the query screen are also broken into two sections. Query, Reset, Count, Sort by, Columns,View by Booking/View by Invoice, and Default, are buttons related to the query. Use the Reset button to clear away any previous query criteria. This clears both the General and Advanced tab. Count is used to give the number of items that match the query criteria. Sort By tells the query screen how to display the results once the query is executed.
Columns is used to select which columns of data are displayed in the results screen. Click Columns and choose the columns to display by highlighting the column in the Available Fields and clicking on the left arrow to move it over to Displayed Fields.
Using the red up and down arrows, put the column in the order to appear on the results screen. Go out to the results screen and size the columns. Go back into Columns and click Save Settings and OK to save. Next sort the columns by 3 sorts in ascending and descending order. When completed, make sure to click Save Settings.
Drag and drop the columns to re-position them on the results screen if desired. Do this by clicking on the column to move, holding down the left mouse button, and sliding the column to any position on the query screen. To place a column to the right or left of any existing column, stop on the column to the right or left and release the mouse. The moved column is inserted in the correct place. Click Columns and click Save Settings and OK to save.
View by Invoice/View by Booking is a toggle button. When View by Invoice is clicked, invoices are displayed, but clicking it again changes this to View by Booking. This displays bookings only, and the Columns button has many new booking level fields for display that are not under the Column button when View by Invoice is selected.
When View By Booking is shown on the button, the view is at the Invoice Level, but if View By Invoice is shown on the button, the view is at the Booking Level.
To save the filters in the query, use Default and follow these directions to create a new Saved Query:
1. Change the selection criteria on the results screen for the new query to save.
2. Click Default.
3. Type in the new query name in the Setting Name field.
4. If this saved query is the default, at the top of the drop-down window, check Set As Default.
5. Select Per User (on the user’s own workstation only) or Global (on everyone’s sets).
6. Click OK to save.
To remove a saved query from the list, check the Remove the Current Named Setting box, click OK and the saved query is no longer available for use in the drop down field.
On the Invoice Query Screen, use <Shift>, left-mouse click for selecting a range of items for closing, deleting, or printing, etc. Using <CTRL>, left-mouse click selects multiple individual items in any order for closing, deleting, etc.
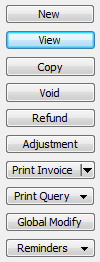
Once the listing of matching invoices is displayed through Query, any invoice appearing can be added (New), viewed (View), copied (Copy), voided (Void), refunded (Refund), or adjusted (Adjustment - debit or credit memos).
Create Adjustment invoices for Supplier and Comm Track Invoices by changing the Submit To field from ARC/BSP to Supplier or Comm Track. Write off revenue (commission) on a booking through the End of Period without having to do a Journal Entry. Create a Supplier Adjustment by selecting Adjustment for a queried non-ARC/BSP invoice from the Invoice Query Screen.
Print Invoice - To print an invoice "on the fly", select Use Default Criteria or Use Print Dialog Screen. If Use Print Dialog Screen is selected, the user is presented with the Print Invoice Screen found under Reports|Invoice|Invoice Print. Changes can then be made for that specific print job. Once the Print Job in the invoice query has been completed, the settings revert back to the default settings as they were before. If the Use Default Criteria is selected, no dialog screen is presented and the invoice options used are the default settings as they exist.
Print Query - Print All Items or Selected Items (by holding down the CTRL key and picking entries). To create a .txt file for export, select Export All Items, or Export Selected Items.
Invoice Query Global Modify
The Invoice Query Global Modify feature enables changes to the agent on queried invoices, modifies UDID’s on queried invoices or updates invoice and payment groups en mass.
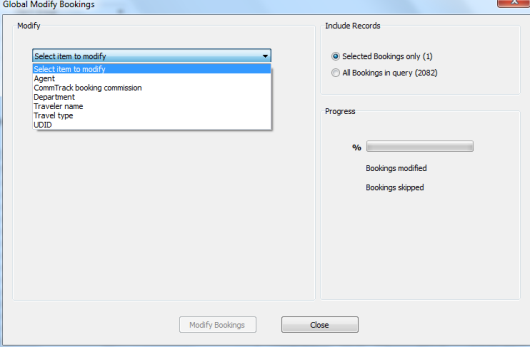
Special Note: Upon modification, the Global Modify summary shows the number of invoices modified in green and the number of invoices skipped in red. On the Query screen, after Global Modify has been used, two new tabs are shown: Modified Records and Skipped Records. On those tabs, modified fields are shown in green and skipped fields are shown in red.

Globally Modify a Branch on Queried Invoices
From the query results screen, multiple invoices can be selected (Shift Click/Control Click) and only the branch on those will be updated. If no selection is made, all invoices in the query results screen receive the update. Click Global Modify|Invoice Branch from query screen. From the drop-down, select the Branch to which you are globally modifying the invoices. Click Modify Invoices.
Note: Cannot change a branch that is on an invoice in a closed period.
Globally Modify an Agent on Queried Invoices
First from the query results screen, multiple invoices can be selected (Shift Click/Control Click) and only the agent on those will be updated. If no selection is made, all invoices in the query results screen will receive the update. Click Global Modify|Agent from the query screen. Type in a few letters of the Old Agent’s name and select Inside or Outside, Inside or Outside from the drop-down. Repeat for the New Agent area. The agent’s percentage rate, commission amount, and role (Inside or Outside) can also be modified. Remarks can also be added using this feature. To modify an agent whose profiles are marked inactive, first make the profile active, make the changes, and then make the profile inactive once again.
Note: When changing an agent, if the Date Paid field is populated in the Agent Tab in the booking, the invoice cannot be modified.
Globally Modify a Client Name on Queried Invoices
From the results of an invoice query, when in View by Invoice mode, Global Modify has a Client Name option. There is a checkbox option "Update Client Name on all Associated Payments." This box is checked by default and can be unchecked if you don't want to update the Client Name on the payments.
Globally Modify UDIDs on Queried Invoices
From the query results screen, multiple invoices can be selected (Shift Click/Control Click) and only those invoice UDIDS will be updated. If no selection is made, all invoices in the query results screen will receive the update. Select the UDID to add or modify and in the To field enter the information that should appear. Any invoices containing bookings with data for that selected UDID field, will be updated with new information. Any bookings in the query where the UDID is not specified would have the UDID field added.
Query by UDID Number or UDID Description in Global Modify
When UDID is selected as the item to modify, there are now two dropdowns. You can type a UDID number on the left or scroll through the list. You can type a UDID description in the dropdown on the right or scroll through that list. Selecting a UDID in either dropdown will update the UDID displayed in both dropdowns.
Typing in a UDID number (or partial number) can land on the desired UDID more quickly than by scrolling through the list. The UDID Selection dropdown is labeled 'UDID Description' and is available for those who prefer to search by description. Selecting a UDID in either dropdown will update the UDID displayed in both dropdowns.
Global Modify can be used on more than one UDID without having to click "View Results" before re-launching Global Modify for the next one. From the results of an invoice query, when in View by Invoice mode, select the desired invoice(s) to modify. Check the "Continue Modifying UDIDs" box, and you will be able select the next UDID to add to the bookings in the selected invoices. Once you are done, click "View Results" to exit the Global Modify window and review your changes.
Globally Modify Invoice/Payment Groups on Queried Invoices
From the query results screen, multiple invoices can be selected (Shift Click/Control Click) and only those invoice and payment group fields will be updated. If no selection is made, all invoices in the query results screen will receive the update. Click Global Modify|Invoice/payment group. When clicking in the Set Group To field an invoice group can be selected in the drop-down, but the field also accepts free flow.
There is an additional check box that when selected also updates the client payment attached to the updated invoice. Vendor payments attached to the invoice will not be updated.
Notes:
* If an invoice group already exists, the global modify group selection overwrites the existing group.
* If a group exists in the payment, the global modify feature will not update the payment with the new group.
* Cannot change an Invoice/Payment Group on an invoice in a closed period.
Globally Modify Commissions on Queried Invoices
Global modify can be used to update the commission rate percentage in a booking. Modifications will only take place if the booking is commission track, if there is no vendor payment on the booking and no agent date paid exists (the agent has not been paid for the transaction). When the booking commission is changed, the agent commission will also be updated accordingly. There is no undo after the commission rates have been changed. Suggestion: when using the global modify feature options to only use one option at a time (uncombined).
From the invoice query screen, query the invoice bookings to be modified and click on the View by Booking button (so the query is in view by booking mode). Either select the bookings from the query results screen (if the updates will not apply to all bookings) or if the updates will apply to every booking in the query result screen, don't select any and click the Global Modify button. In the comm track booking area, click the box next to Set Commission Rate To and enter the percentage amount. Set the option for either Selected Query Results or All Query Results accordingly. A prompt is displayed outlining the number of bookings changed and the number of bookings skipped. Bookings are skipped if they are not a comm track booking, if they have a vendor payment applied (closed) or if the agent has been paid.
Right-Mouse Click Menu in Invoice Query Result Screen
If the View by Invoice button is activated, these are right-mouse clicks available for use.

Select - select current invoice.
New - create new invoice.
View the invoice.
Copy the existing invoice.
Void/Unvoid the existing invoice.
Refund - create refund invoice.
Adjustment - create debit/credit memo.
Print invoice - print copy of invoice.
Query all Payments on the invoice.
Reminders - Create and view reminders.
Right-Mouse Click Menu in Booking Results Screen
If the View by Booking button is activated, these are right-mouse clicks available for use.
Select - select highlighted booking
New - create a new booking
View the booking
Copy the booking
Void/Unvoid the existing booking
Refund - Create refund for booking.
Adjustment - Create debit/credit memo for booking
Print Invoice.
Query All Payments.
Reminders - Create or view Reminders
Right-Mouse Click Menu in Invoice Booking Screen
Having double-clicked on an invoice and to see the bookings therein, right- mouse click to see the following items:
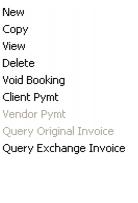
New - create new booking.
Copy the existing booking.
View the booking.
Delete the booking
Void/Unvoid the existing booking.
Client Pymt - To void or see the client payment.
Vendor Pymt -To void or see the vendor payment.
Query Original Invoice.
Query Exchange Invoice.
Sorting Invoice Query Data
Sort data in all query screens in two ways:
1. “Quick” sort by one field by clicking on a column in the results screen. The first click sorts the column in ascending order (first to last or earlier date to more current date), and the second click sorts in descending order (last to first or current date to earlier date).
2. Sort in Ascending or Descending order by up to 3 columns. When clicking Sort By, select the first, second or third column sort and what order (ascending or descending) want the data will be displayed. Enter the selection criteria and click Save Settings and OK.
Helpful Hints: Don’t forget to use hotkeys to quickly navigate into an invoice area or any area in TBO. If the item has an underlined character in its title, hold down the ALT key on the keyboard, and press the hotkey to navigate into this area. Also to view a history of what has been changed in a queried invoice, click the History button. There is a field in the Advanced Tab for querying for invoices Invoiced in CBPlus.
Viewing/Modifying an Existing Invoice
To edit an invoice previously entered into Trams, do so under Query.
1. Click Invoices|Query or click on Invoice Query tab below.
2. Query by any one or more of the fields shown. It is best not to fill in all the fields since two or three fields are sufficient. Click Query to process.
3. Click to highlight the desired invoice and click View. (Or double-click the selected invoice.)
4. To modify the invoice, first check the client payment and the vendor payment. If the Client Pymt and Vendor Pymt buttons are dimmed for the selected booking proceed to Step 6. Dimmed Client Pymt and Vendor Pymt buttons indicate that no payment exist.
5. Darkened Client Pymt and Vendor Pymt buttons indicate a Client or Vendor payment is in place. These payments must be voided before bookings can be modified. Click the down arrow on Vendor Pymt or Client Pymt to view or void the payment(s). Click View to view the payment and to print the payment before voiding. Void the payment(s) by clicking Void. Trams prompts, Void Payment. Click OK to void, then click View to modify the highlighted booking.
6. Enter all necessary changes.
7. Once the changes have been entered, click OK to display the Booking Summary screen. Click OK again to save the invoice.
8. Trams prompts, Enter A Payment For This Invoice? If payment was voided in order to modify the invoice, click OK and enter the payment information. Click OK again to save.
(Tip: Use Ctrl-PgDn/Ctrl-PgUp to access next or previous invoice or booking.)
Move from One Invoice to Another in Query
Move easily from one invoice in a query to another or from one booking in an invoice to another by using the left and right arrow buttons located at the bottom of the open invoice or booking screen:

Copying Queried Invoices
To copy information from an existing Invoice into a new Invoice, highlight the appropriate Invoice and click Copy. The system displays a new invoice record with all defaults completed from the copied invoice.
Note: The Issue Date defaults to the system date, the Invoice Number defaults to the last entered invoice number plus one upon saving, and the Ticket Number, if applicable, defaults to the last entered ticket number plus one, instead of using the copied invoice's defaults.
Any of these defaults can be changed or deleted and additional information can be entered before saving the new Invoice. This shortcut comes in handy when dealing with groups and large numbers of invoices to be hand-entered containing similar information.
Refund Invoices
Refund invoices look and act exactly like Sales invoices, except they are deducted from the Sales figures and they reduce Client, Vendor, and ARC/BSP Balances. Anything that can be entered in a Sales invoice can also be entered to a Refund invoice.
Note: All sales and refunds should be accounted for by an invoice.
Capture refund Invoices either by entering all new refund information under Invoices|Refund (like a new sales invoice entry), or by using an existing sales invoice called up in query screen and clicking Refund to default information into a Refund Invoice entry screen.
ARC/BSP Refund Invoice - Inv. Entered
To enter a refund invoice when the original sales invoice has been entered into Trams:
1. Click Invoices|Query.
2. Query the original sales invoice by invoice number, or any one or more of the fields shown. It is best not to fill in all the fields; two or three fields are sufficient. Click the Query button to process.
3. Highlight the invoice to be refunded by clicking on it and then click the Refund button. This copies the sales invoice information into a refund invoice screen.
4. Type in the Refund Invoice number.
5. The Issue Date field defaults to the current date. If the date of the invoice is different than the date shown, type in the desired date. Invoice Number and Issued Date reflect the current defaults. Default the refund invoice to have the same invoice number as the original Sales Invoice by setting this option up in Utilities|Global Defaults|Prompt|Default Refund/Adj Invoice No.
6. All bookings from the original invoice are displayed. If there are any bookings appearing are not being refunded, click them to highlight and press delete to remove.
7. To modify the invoice booking information, click the booking to highlight it and then click Modify.
8. To make any changes to the Total Fare, Commission/Rate, etc., highlight that field and type in the correct information.
9. Complete the invoice as normal. Click OK to store the information and return to the booking summary screen. Click OK a second time save.
10. Trams prompts, “Enter a payment for this invoice?” If the invoice is being paid by credit card, click Yes. If the invoice is being paid by Cash, Check, EFT or CC Merchant, click the NO button and enter the payment under the Payments menu. (See Payments Received in Payments chapter.)
ARC/BSP Refund Invoice – Inv. Not Entered
To enter a refund invoice when the original sales invoice was not entered into Trams:
1. Click Invoices|Refund.
2. Type in the refund invoice number to create. Trams automatically defaults to one number greater than the last invoice number created upon clicking OK.
3. If the agency has multiple branches, enter the appropriate branch number for the invoice in the Branch field.
4. In the Issue Date field, type in the date the invoice was driven.
5. If the invoice belongs to a group, enter the group designator in the Group field.
6. In the Remarks field, type in free flow information.
7. In the ARC/BSP No field, click the arrow and choose the appropriate branch.
8. In the Client Name field, type in a few letters of the client’s name. Trams displays any matching profiles. Click on the correct profile. If a match can’t be found, Trams prompts to create a new profile.
9. Trams displays the General Info screen.
10. Leave the Submit To field as ARC/BSP.
11. In the Flown Carrier field, type the two-letter code of each carrier on the ticket.
12. The Travel Type field defaults to Air. For a list of other Travel Types, click the arrow.
13. In the Itinerary field, type in the City Pairs. Include the Departure City, connecting cities, and the Arrival City.
14. If the name of the person traveling is different than the profile name, enter the correct name in the Passenger field, or click on the arrow.
15. In the Department field, type in the name or number of the department, or leave blank.
16. In the Airline field, type in the two-letter Airline Code.
17. The Ticket No defaults to the next available number. If it isn't correct, type in the 10-digit number. (Do not include the 3-digit airline code or the check digit.)
18. The Vendor Name field is automatically filled in when the Airline Code is entered. For an MCO, type in the Vendor Name, if different than the Airline.
19. Leave the Confirm No field blank for an airline ticket. In the case of an MCO for a tour, type in the confirmation number.
20. Enter the Depart Date and the Return Date or leave blank.
21. Type in the amount being refunded in the Total Fare field.
22. The Base Fare field is calculated automatically after the taxes are filled in.
23. Enter the amount of tax in the Taxes/Rate field. (A default percentage can be set up in the Utilities menu. See Utilities chapter.)
24. The Commission/Rate field defaults to 10%. If the commission amount differs, type in that amount, including the decimal point. In some cases commission would not be lost. So if earning commission, type a hyphen (-) and the dollar amount.
25. Leave the Ticket Type set to Normal.
26. Leave the Resubmit Date field blank.
27. In the Ind field, click the arrow and select from Domestic, International or Transborder.
28. Click the Remarks tab. Remember! Information entered in the client remarks box prints on a client statement. Information entered in the vendor remarks box prints on a vendor statement. Type in free flow information.
29. To enter additional information, such as fare savings information, click the Expanded Fare Info tab.
30. In the case of multiple taxes, click the More Taxes tab.
Debit/Credit Memos and TAAD’s/SSAN’s
Enter an adjustment invoice for Debit/Credit memos or TAAD’s under the invoice query screen, in Adjustment. SSAN’s are the BSP equivalent of TAAD’s.
Invoices|Adjustments
Track Debit/Credit memos and TAADs and link them to client and vendor profiles for reporting purposes. In the booking screen there is a field called Ticket Type. Change this field to read either Debit Memo, Credit Memo or TAADs clicking on the arrow and highlighting the section.
Invoices|Adjustment Invoice
Special Note: Agent commissions are automatically adjusted with each Debit/Credit memo entered if the Percent field of the Agent Tab of the original invoice booking has a value in it. If only the Amount field has a value in it, that field will be blank in the Adjustment Invoice, so enter the correct amount on the Agent Tab of the Adjustment Invoice.
Air Canada Credit Memos

Air Canada pays commissions via credit memos, which are processed through BSP. These are the recommended steps agencies should follow to properly account for these transactions.
1) Create the invoice in TramsBack Office either via interface or manual entry. The issue date will reflect the actual date of the sale:
* Submit to = Supplier (Comm Track invoices would not account for sales/cost of sales in the general ledger)
* Total Fare = Amount of ticket
* Commission = Amount of commission earned on the ticket
* Form of Payment = Credit card
* Sales Agent(s) = Sales Agent(s) in PNR
2) On the Monday after the BSP Canada Web sale, BSP will e-mail a Web Cash Reward report and Web Account file.
3) Upon receiving the BSP Report, it will list the credit memo, and at that time be sure to create an Adjustment Invoice in Trams Back Office (Invoices|Adjustments, or Debit/Credit Memo) - one booking record for each confirmation number.
* Client name on the invoice = Air Canada
* Vendor name on the invoice = Air Canada
* Memo number in the invoice = Credit memo number
* Original Ticket number in the invoice = Credit memo number
* Do not enter any Sales Agents to the credit memo as they were already tagged when the supplier invoice was created in Step 1
4) Perform the BSP Settlement as usual.
5) Run a Vendor Statement Summary report (Reports|Vendor|Statement) and compare this to the Credit Memo from Air Canada. This serves as a reconciliation process to ensure that the proper commissions were received from Air Canada on the Credit Memo.
* Report type = Summary
* Vendor Name = Air Canada
* From and To dates = BSP reporting period
6) Write off the Vendor Balance on the Vendor Balance Report created from Step 1. Go to Payments|Received after determining the amount of write-off based on the reconciliation process in Step 5. Enter the amount in the amount field of the payment received screen with a Pay Method = Other; Payment Date = BSP Settlement Date; Profile Type = Vendor Supplier; and Name = Air Canada. Toggle closed invoices that were paid by the Credit Memo from Air Canada and journalize to BSP Adjustments.
Note: Agent Statements will be affected by the write-off of the Vendor Balance, as this is a Supplier CC transaction and should be set to Vendor Payment Date.
Voiding Invoices
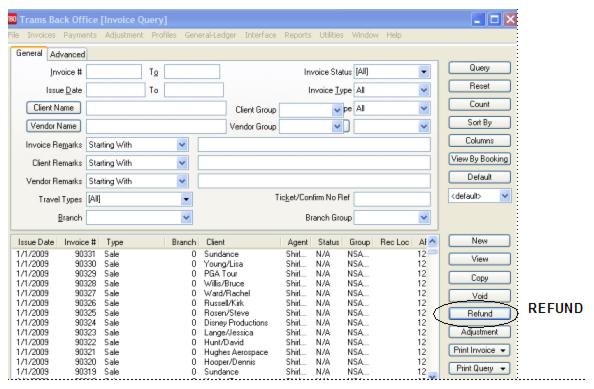
Go to Invoice|Query to bring up the following screen:
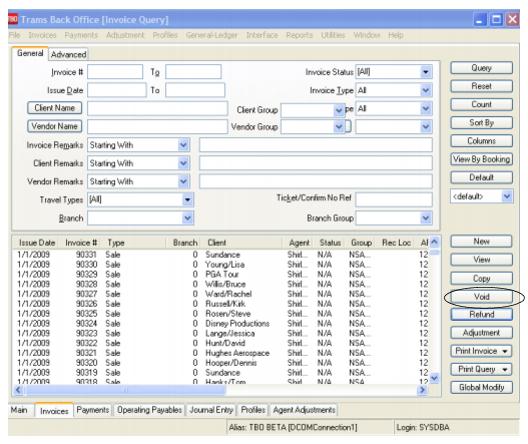
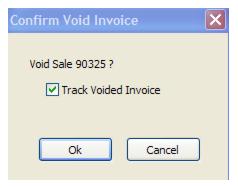
To void an invoice, query the invoice, click to highlight and then select the Void button. The system prompts, “Void Sale xxxx? (xxxx is the invoice #). To track the Invoice Number and any corresponding ticket numbers in Trams as void, check Track Voided Invoice. (To be able to Unvoid in future, this area must be checked off.) To erase the invoice entirely from the system, uncheck Track Voided Invoice.Select Cancel to leave area without voiding.
If any payments have been applied to an invoice, those payments must be voided prior to voiding the invoice. If the only payments (single or multiple) applied to the invoice are credit card payments, the system automatically voids the credit card payments while voiding the invoice. The credit card number does not have to be the same as long as those payments only apply to the invoice being voided.
If there are multiple payments but not with the same form of payment, or the vendor side of a booking has its own payment number, as an ARC booking closed on the vendor side through the ARC Settlement would, then void the payments first and then void the invoice.
Void the invoice by right-clicking and selecting Void or click Void on the Invoice Query Screen.
Void payments by selecting the appropriate invoice, highlighting the booking that has a payment applied, click on the Client Payment or Vendor Payment button, then Void Payment, and select OK when prompted. To track the voided payment, check the box Track Voided Payment. Set tracking as permanent option by going to Utilities|Setup|Global Defaults|Prompt and checking off Always Track Voided Payments.
A word of caution: After voiding a payment that is not tracked, there is no maintained history on that. Be careful about voiding payments without tracking. If querying for a partial payment and voiding a payment linked to a closed invoice, a message is displayed: This payment represents a partial payment for one or more invoices. Are you sure you want to void? Yes. No.
Unvoiding Invoices
Having the ability to reinstate an invoice is a convenient and time saving feature. If Yes to tracking was selected when initially voiding the invoice, to reinstate the invoice do the following: Query the invoice, highlight and select Void. The following screen appears.
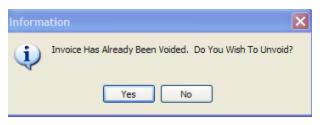
Answer Yes to “Do You Wish To Unvoid?”
Entering Spoiled Invoices/Tickets
To keep track of voided invoice and ticket numbers that have not been entered into Trams, enter them as Spoiled.
- Click Invoices|Spoiled.
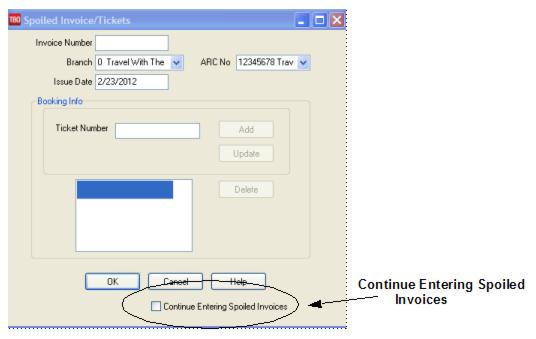
2. In the Invoice Number field, type the invoice number to be tracked as voided.
3. The Branch field defaults to 0. To change the branch number, type in the number or click the arrow to select from the list.
4. In the Issue Date field, enter the date the invoice was printed. For an ARC/BSP document, type in the ARC/BSP week during which it would have appeared.
5. In the Ticket No field, type the ticket number(s) to be tracked as voided. Click OK to save.
Voided Invoices Retain Original Client & Vendor
Voided invoices retain the booking details if Yes was selected to tracking when voiding an invoice. Search for voided invoices by going to the Invoice Query screen, then to Invoice Status. Click on the down arrow to see the option list. Click on Voided and process. Note:Print voided ticket reports from the Report Generator screen. This enables the agency to keep track of voided invoices by name and yields more flexibility when printing.
Finance Charges
If adding a finance charge for any invoices remaining open longer than, perhaps, 30 days, there is now a way of keeping the finance charge portion of open invoices separate from the original invoice. Create a separate finance charge invoice for any money owed by, effectively separating the original charge from the finance charge. This feature adds finance charges to any client's account that appears on the Client Balance Core Report.
- First, go to Utilities|SetUp|Travel Types.

2. Highlight a User-Defined field and name it Finance Charge.
3. Under Travel Category, Select Other.
4. Click Update and OK to save.
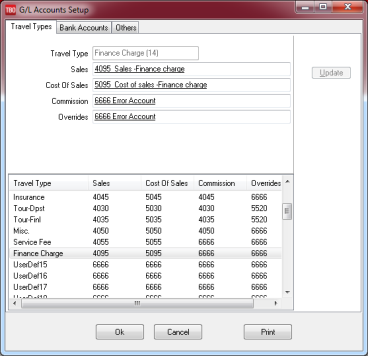
5. Go the General Ledger|Accounts and create accounts for finance charges. Set-up an account in the 4000 series for Sales and one in the 5000 series for Cost of Sales.
6. Go to Utilities|Setup|GL Accts and select the Finance Charge Travel Type by clicking that line. Edit the accounts at the top of the data entry screen to the account numbers just created and click Update to accept the changes.
Create the Finance Charge Invoices
- Go to Invoice|Finance Charges.
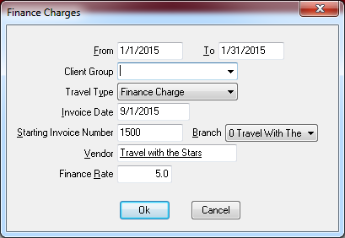
- Enter the From and To dates.
- If running the charges for a group of clients, select that group from the drop-down menu.
- Select the Travel Type of Finance Charge from the drop-down menu.
- Enter the date of the newly created Finance Charge Invoices.
- Assign a starting invoice # (choose numbers unique to this category).
- From the drop-down menu, select a branch for the newly created Finance Charge Invoices.
- Enter the Vendor name, which is usually the agency’s name.
- Enter the rate (in whole numbers, 10.0 = 10%; 5.0 = 5%).
- Based on the dates, for every open invoice, the system builds a new invoice reflecting the finance charges for the client.
Note: Be sure to run this finance charge calculation only once for a given time period. Otherwise, this will be adding finance charges upon finance charges for the same period, and create another open invoice. Check dates carefully.
Transfer Invoice/Payment to Different Profile
If an invoice and/or payment has been applied to the wrong client (in a closed or open period), transfer the invoice/payment all at once by querying invoice up and changing the name of the client.
1. Query the invoice that needs to be moved to a different client.
2. Highlight the invoice and click View; or double click on the invoice.
3. Click the client Name field and type in a couple of letters of the profile to change on the invoice.
4. Use the down arrow to find the exact match. Click OK to process.
5. Get the following message if there is a payment attached:
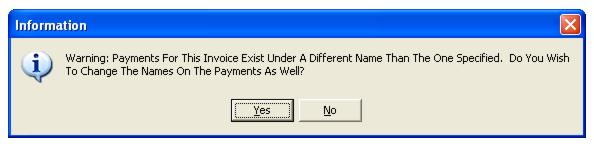
6. Click Yes to transfer the payment as well OR select No for payment to remain under the original Client Name.
7. Query up and delete out the duplicate profile if applicable.
Resubmit ARC/BSP Document
To resubmit an ARC/BSP document:
1. Click on Invoices|Query.
2. In the Invoice # field, type in the invoice number being resubmitted and click Query.
3. Highlight the invoice and click View.
4. Once the invoice booking(s) are displayed, highlight the appropriate booking and click Modify.
5. Click the Resubmit Date field and enter a date that falls into the ARC/BSP week in which this ticket is to be included. Click the OK button to view the booking summary screen.
6. If submitting more than one booking on the invoice, repeat steps 4 and 5.
7. Click OK to save the changes.
Account Net Remit Acct (Southwest Ticketless)
1. Enter a Sales Invoice as usual.
2. In the Submit To field, select Supplier.
3. In the Vendor Name field, enter the vendor’s name.
4. Fill in the Total Fare, Taxes/Rate and Commission/Rate fields.
5. Enter a Payment Received (Cash, Check, Credit Card, or CC Merchant) from the client, as usual, and close the invoice.
6. Print a Vendor Statement with the dates of the billing period (e.g. monthly/weekly/biweekly).
7. Click Reports|Vendor|Statement and complete the information, as usual.
8. In the Submit To field, select Supplier.
9. In the Vendor Name field, type in the vendor’s name.
10. In the Issue Date field, enter the date range of the billing period (e.g. monthly/weekly/biweekly).
11. Click Preview to view the report on screen. (Or click Print to send the report directly to the printer without viewing first.)
12. Once the report is on the screen, click the printer icon.
13. The Account Balance on the report shows how much the agency owes to the vendor, or how much the vendor owes the agency. If the Account Balance is negative, the vendor is owed money. If the Account Balance is positive, the vendor owes commission for the period (if there are more Credit Card sales than Cash, Check, CC Merchant sales).
14. To pay the amount labeled Account Balance from the statement, if the statement is negative, create a Payment Made to the vendor. (See section, Payment to a Vendor in the Payments chapter.) If the amount on the statement is positive, create a Payment Received from the vendor, once payment is actually received.
When entering either a Payment Received or Payment Made, enter information as usual. When the list of invoices is displayed, close all invoices shown with positive and negative amounts as listed on the Vendor statement for the period.
Transactions with Deposits and Final Payments
Option One - (Recommended)
Create two separate invoices; one invoice at the time the Deposit is collected, and the other at the time of the Final Payment.
1. Click Invoices|Sale. Enter the invoice for the Deposit as usual. (See Entering a Sales Invoice in this chapter.)
2. In the SubmitTo field, choose Supplier.
3. In the Total Fare field, enter the amount of the Deposit collected from the client that will be sent to the vendor.
4. The Commission/Rate field is zero since this is a Deposit only.
5. To track the final payment due date, click the Expanded Fare Info tab.
6. In the Due Date field, type the Final Payment due date.
7. In the Amount field, type in the Final Payment amount.
8. In the Comm Amount field, type in the commission earned on the entire sale amount.
9. Complete the rest of invoice as usual.
10. Click OK to display the Booking Summary screen. Click OK again to save the invoice.
Print a Final Payment report once a week to track final payments due:
1. Click Reports|Report Generator|Print Report.
2. In the Report field, type FINL_PAY.
3. Click the Advanced Tab and in the Final Payment Date From and To fields, type in the due dates.
4. Click Preview to view the report. (Or click Print to send the report directly to the printer without viewing first.)
5. Once the report is displayed, click the printer icon to print.
From this report, create final invoices to generate client statements.
Trams recommends this option because it keeps accurate client and vendor histories without having to account for the income until the final payment is received. Therefore, there are no client or vendor balances to pay taxes on before actual income is received.
Option Two
One invoice is created for the entire sale at the time the deposit is collected, with two booking records. The first booking is for the deposit amount with commission as zero. The second booking is for the final payment amount with the full commission amount.
1. Click Invoices|Sale. Enter the invoice as usual. (See section, Entering a Sales Invoice in this chapter.)
2. In the SubmitTo field, choose Supplier.
3. In the Total Fare field, enter the amount of the Deposit collected from the client that will be sent to the vendor.
4. The Commission/Rate field is zero since this booking is for the Deposit only.
5. Complete the rest of the booking as usual.
6. Click the New Booking button to enter the second booking.
7. In the SubmitTo field, choose Supplier.
8. In the Total Fare field, enter the amount of the Final Payment.
9. In the Commission/Rate field, type in the commission earned on the entire sale amount.
10. Complete the rest of the booking as usual.
11. Click OK to display the Booking Summary screen. Click OK again to save the invoice.
Use Option Two to account for the entire sale at the time of booking. This creates a Client Balance and a Vendor Balance for the final payment amount due.
Split Forms of Payment for Client Invoices
When one booking on an invoice is paid by credit card and another booking is paid by cash/check, separate payments are required. If invoice has already been entered please refer to the section entitled Split Forms of Payment for Client Invoices in the next chapter, Payments.
If the invoice has not yet been entered:
1. Click Invoices|Sale. Create the invoice, as usual, for the booking record Paid by Credit Card only. (See section, Entering a Sales Invoice in this chapter.)
2. Click OK to save the invoice. Trams prompts, “Enter a Payment for this Invoice?” Click YES. Enter Credit Card information. Click OK to save.
3. Click Invoices|Query.
4. In the Invoice # field, enter the newly created invoice number. Click Query to process.
5. Once Trams displays the invoice on the screen, click View, then click New to add the second booking record.
6. Once all the information is entered for the second booking, click OK to view the booking summary screen. Click OK again to save the invoice and prompt for a payment.
7. If there is the ability to enter cash payments from the invoice, enter the payment now. (See Global Defaults in Utilities chapter.) If not, answer “No” to payment and enter the cash/check payment under the payments menu. (See section, Payments Received from Client in the Payment chapter.)
Discounted Transaction — Paid By Cash/Check
A Discounted Transaction is when the agency sells travel to a client at a lower price than reported to ARC/BSP or to a vendor. To account for the Client Receivable and the Vendor Payable correctly, enter a sales invoice (see Entering A Sales Invoice in this chapter) with the following adjustments:
1. Click Invoices|Sale.
2. In the Total Fare field, type in the actual amount the client is paying. For example: a $200 ticket with a discount of $5 is entered as a total fare of $195.
3. In the Taxes/Rate field, type in the exact amount of tax as it appears on the ticket.
4. In the Commission/Rate field, type in the amount of commission earned. For example: a $200 ticket with a commission of $20 and a discount of $5 is entered in the Commission/Rate field as $15.
5. Click the Expanded Fare Info tab.
6. In the Face Value field, type in the full amount of the sale to be reported to ARC/BSP or to the vendor; e.g., $200. Click OK to save.
Discounted Transaction — Paid By Credit Card
A Discounted Transaction is when the agency sells travel to a client at a lower price than being reported to ARC/BSP or a vendor. If the client’s form of payment is credit card, Trams recommends creating a negative booking on the sales invoice for the discount amount.
Enter a Sales Invoice as usual (see section, Entering a Sales Invoice in this chapter) and pay it off with a credit card payment.
- Click Invoices|Query. Query the original invoice and click View, then New.
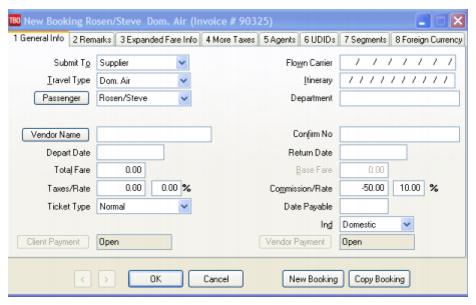
2. In the Submit To field, click the arrow, then click Supplier.
3. In the Vendor Name field, type in the Agency name. Trams prompts to create a new profile (if one has not been created). (See section, Entering Vendor Profiles in the Profiles chapter.)
4. In the Total Fare field, type in the amount of the discount with a hyphen (-) in front of the number.
5. In the Taxes/Rate field, type in 0.00.
6. In the Commission/Rate field, type in the same amount as the Total Fare, (the amount of the discount) with a hyphen (-) in front of the number. Click OK button to view the Booking Summary screen. Click OK again to save the invoice.
Note: Since the Total Fare minus the Commission equals $0.00, the amount due from the Vendor is $0.00.
To give the client back the discounted amount, enter a Payment Made to the client. Close the invoice.
Rebates
There are two ways to enter Rebates.
Method A:
1. Enter a Sales Invoice as usual. (See section, Entering a Sales Invoice in this chapter.)
2. Change the Submit To field to Supplier.
3. Type in the travel agency’s name in the Vendor Name field.
4. Both the Total Fare and the Commission/Rate fields are the amount of the rebate. Enter both amounts as a negative (-) number.
5. Click OK to save.
6. Enter a payment to the client under the Payments menu, as usual.
Method B:
1. Click General Ledger|Accounts.
2. Create a General Ledger account called Client Rebates as a Cost of Sale account (5XXX) or an Expense account (6XXX). (See section, Add To The General Ledger Chart of Accounts in General Ledger chapter.) Is this a possible discussion with the agency’s accountant?
3. Next, click Payments|Made.
4. Enter the payment made, as usual, for the rebate amount.
5. Profile Type is Other.
6. In the Name field, enter the client’s name. If there is no match, Trams prompts to build a new profile. (See section, Entering Client Profiles in the Profile chapter.) Click OK to save.
7. Trams prompts, “Create a Journal Entry?” If maintaining the General Ledger click YES.
Example Journal Entry
|
Acct # |
Name |
Debit |
Credit |
|
1000 |
Cash in Bank |
|
XX.XX |
|
XXXX |
Client Rebates |
XX.XX |
|
8. Click OK to save.
Handling Groups in Trams Back Office
Managing groups and keeping the accounting organized can be challenging, due to the number of transactions taking place, and more importantly, due to the lack of a relationship between the amounts collected and amounts paid out. Although each group is different, here is an example of handling a group situation. Most agencies, when dealing with a group, account for Sales or Income once the entire group is complete or the group has departed.
The simplest way to determine the profit earned on a group is to calculate the difference between what is collected from client for the group and what is paid out to vendors for the group. Keeping this concept in mind, here is a way of handling groups in Trams.
1. Although the profit is calculated for the group as a whole, the payments need to be tracked for each client. Thus, each client traveling in the group must have a separate Client Profile in Trams. First create a Client Group (i.e. SKI’12) under Utilities|Setup|Groups. (See Creating Group Identifiers in the Profile chapter.)
2. Next, in each client’s profile click the Groups tab, then select the client group created in step 1. This ties all of these profiles together for reporting purposes later, such as printing mailing labels for the group.
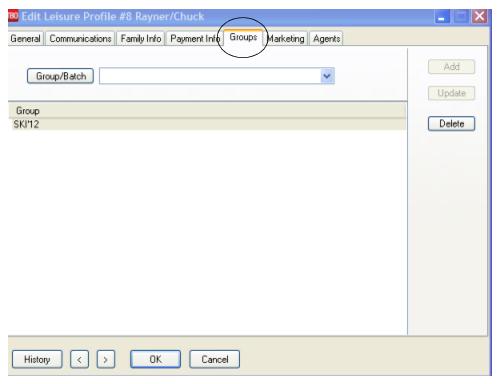
3. Even if the vendor is already set up in Trams, or there are multiple vendors involved, build a single Vendor Profile for the group. Make the vendor name descriptive e.g.Ski Group-Winter 12.
4. Next, create an Invoice|Payment Group (i.e. SKI’12) under Utilities|Setup|Groups. (See Creating Group Identifiers in Profile chapter.)
5. When any group payments are received from clients, enter the Payment Received as usual. Make sure to click the arrow next to the PaymentGroup field and select the Invoice/Payment Group name that was created in Step 4. When prompted, create a voucher for the payment.
6. To see how much has been collected so far, print a Group Client Statement, in Reports|Client|Statement. In the report screen change Report Type to Summary. Change the Format to Group. Click the Invoice Group field and select the Invoice|Payment Group name for the group. Also look at the Group Revenue Report under Report|Payments|Group Revenue. No invoices have been created at this point.
7. When any group payments are made to vendors, enter the Payment Made to Vendor-Supplier and point to the Vendor profile name for the group. (Enter the actual Payee in the Name on Check field.) Make sure to click the arrow next to the PaymentGroup field and select the Invoice|Payment Group name that was created in Step 4. When prompted, create a voucher for the payment.
8. At any time see how much has been paid out to vendors for the group, by printing a Vendor Statement in Reports|Vendor|Statement for the Vendor profile name for the group. Also look at the Group Revenue Report under Report|Payments|Group Revenue. Note: When viewing the Current Group Profit amount on the Group Revenue report, the cost of any tickets (amount that passed on to ARC/BSP for the tickets) needs to be subtracted from this total.
9. Issue invoices for any ARC documents for the group as is done for individual business, so they will appear on the ARC report. Make sure to click the arrow next to the Group field on the invoice screen and select the Invoice|Payment Group name that was created in Step 4.
10. Next, Query the ARC invoices and click the Refund button to refund. Change the Submit To field to Supplier and Vendor to the vendor profile name for the group. Then enter a zero payment received from the client and close the ARC invoice and the refund invoice. Make sure to click the arrow next to the PaymentGroup field and select the Invoice|Payment Group name that was created in Step 4.
11. Wait to issue any non-ARC invoices until the group is completed and the sales and income are to be accounted for.
12. When the group is completed, enter a separate invoice for each client for the total amount collected from that client. Set the Submit To field (on the invoice) to Supplier and specify the vendor profile for this group. Enter the total amount collected as the Total Fare and set the Commission/Rate field to zero.
13. After all invoices are entered, the client balances are zero and the profit on the group is available in the vendor account on the Vendor Balances report or Vendor Statement. The invoice total reflects the difference between what has been collected and what has been paid out. Therefore, the balance reflects the profit for the group.
14. The last step is to transfer the profit amount from the vendor's balance to Income. Enter a Sales Invoice date as the date on which to account for the income. Point to the appropriate Sales Agent, if applicable. Enter the client name. Set the Submit To field to Supplier and specify the Vendor profile for this group. The Total Fare is left at zero. Enter the profit amount determined in Step 13 as the Commission/Rate and click the OK button to save the invoice. This entry increases the income by the amount entered, zeros the vendor balance and updates sales agent's statement.
Note: All client and vendor balances are now zero, but vouchers and open invoices still appear. To apply these balances and clear the accounts, enter a payment for each with the amount set to zero and close all invoices and vouchers. Click here for a Handling Groups document. (For agencies with ClientBase, use this document.